A running toilet may not be quite as bad as a clogged toilet, but if left unchecked, this problem can waste hundreds of gallons of water and quite a few dollars. The fix is easier than you think.
First you need to identify what type of toilet mechanism you have. Gravity-flow toilets use head pressure, or the weight of the water in the tank, to push the wastewater over the bowl's integral trap. The taller the column of water, the greater the downward pressure. This is why water-saving toilets, which use only 1.6 gal. of water, tend to have taller tanks. Pressure-assist toilets will have a large plastic air container in the tank and require a different type of repair.
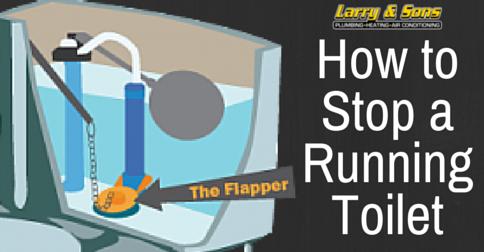
All gravity-flow toilets have two main components: a fill valve that brings water into the tank and a flush valve (the flapper) that sends water from the tank to the bowl. You may think your toilet is flushing normally, but that constant running water sound will eventually get worse.

When a toilet like this acts up, remove the tank lid and watch the flush. You'll see the flush lever lift the flapper at the base of the tank and the clean water in the tank will empty into the toilet. Releasing the lever will drop the flapper back down, sealing the tank so it can refill with clean water. A common issue arises when the flapper doesn't make a good seal—due to sediment buildup or a damaged flapper, which allows water to seep around it. This will prevent the water level in the toilet from raising and shutting off the fill valve, which in effect is like leaving a faucet on all day long.
To fix it, first make sure that nothing—such as a brick to raise the water level or a toilet-bowl cleaner dispenser—is blocking the valve from closing properly. This includes removing any mineral deposits around the seat beneath the valve. Also check that the pull chain attached to the valve is not too short; if so, it could be holding the valve slightly open.
It's often wisest to replace the fill valve and the flapper at once. This will ensure that none of the valves are cracked or warped, which can cause a leak. You can purchase a kit that includes both valves.
To replace these valves, first shut off the water to the tank. Then flush the tank to empty it. To remove the fill valve you'll need a pair of tongue and groove pliers to remove the slip riser and jamb nut that are located directly below the fill valve outside of the tank. Flapper valves are easy to clip on, just make sure the pull chain is properly adjusted.
Timothy DahlDIY EditorTimothy is a lifelong DIY enthusiast who is fixated on smart home tech, beautiful tools, and wrenching on his FJ62 Land Cruiser. This content is created and maintained by a third party, and imported onto this page to help users provide their email addresses. You may be able to find more information about this and similar content at piano.io