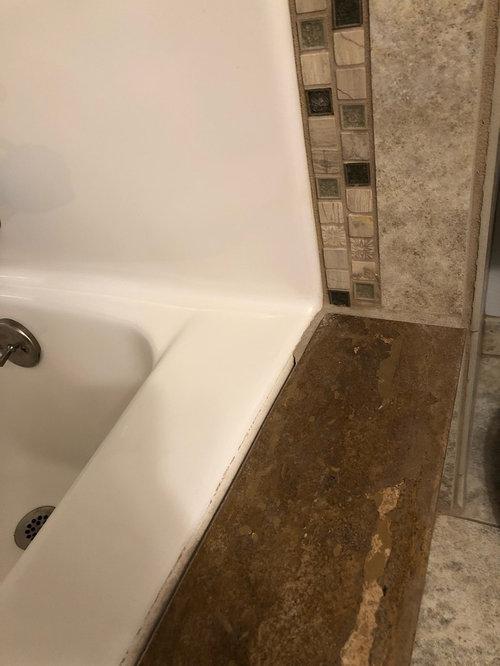
Q: My husband and I are trying to determine how to fix the grout that’s chipping and cracking between the wall and our bathtub. This is our first house, so we aren’t sure what to do. At first, we thought the material between the lower tiles was caulk, but it’s grout. Should we replace the grout with caulk or just fix the grout?
A: In general, grout is the right filler between tiles on a wall or floor, and caulk is for joints where tiles meet a tub and where tiled walls meet at a corner. Your situation involves both of these situations.
To understand why you need two kinds of fillers, it helps to understand some of the basic principles.
Grout is a cement-based material that dries hard, so it works well to fill joints where masonry materials expand and contract relatively uniformly as temperatures fluctuate — such as on a wall.
Caulk is more flexible, even when it cures, so it’s the best joint filler where planes meet at an angle, because each plane expands and contracts horizontally in a different direction as temperatures fluctuate. Also, caulk is the best material for filling joints between dissimilar materials, such as tiles and a tub, because different materials expand and contract at different rates.
Typically, installers leave a gap of 1/8- to 1/4-inch between the lower edge of the bottom row of tiles and the tub. They also leave a small gap at the walls’ corners. They fill these gaps with caulk after they plug the joints between the tiles with grout.
Advertising
In the pictures you sent, the gap between the tiles and the tub is much wider, and, as you say, it’s filled with grout (probably sanded grout color-matched to the tiles). Richard Jenkins, one of the owners of the Grout Genie in Chantilly, Virginia, said he sees this often, usually because the tub isn’t level. The installer set one tile against the tub at the low spot, then raised neighboring tiles to create a level top line and filled in the gap below with grout.
He recommends chipping out the grout and replacing it with color-matched silicone caulk. Brands that supply grout and caulk in matching colors include Mapei (mapei.com) and Tec (tecspecialty.com). Jenkins suggests pushing the caulk into the gap and filling it completely, then smoothing the caulk flush with the tile using an old credit card. His company would charge around $155 for the complete job.
A professional tile setter would not leave a big gap below the tiles. Instead, to compensate for an out-of-level tub, the installer would position a full tile at the tub’s low spot, then trim the bottom edges of neighboring tiles to keep their top edges in a level line. The fact that the installer of your tile didn’t do this raises the possibility that other aspects of the job weren’t done by the book, either.
Are any of the bottom pieces loose? If you can pull off one or more pieces with hand pressure alone, there could be moisture problems in the wall, possibly because the installer used the wrong material under the tile. Tile is sometimes glued to a type of moisture-resistant drywall commonly known as “green board,” a reference to the color of the paper over the gypsum core. The paper is treated to make it moisture resistant, but the gypsum core is still vulnerable to moisture damage, and green board should never be considered moisture proof. Manufacturers recommend green board for moist rooms, such as bathrooms and basements, but not for wet surfaces, such as tub and shower surrounds. USG Sheetrock, for example, notes that its UltraLight Mold Tough, a kind of green board, should be used as a base for tile only in dry locations.
It’s theoretically possible to take out and redo only the row or rows that moisture has gotten behind. (This Old House offers suggestions for this, which you can find by doing a Web search for “saving a soggy shower wall.”) But if you break even one tile and don’t have leftovers, a patch job won’t be practical unless you’re lucky and find a match, perhaps at a store that sells used and surplus building materials. One possible solution: Get skinny liner tiles in a contrasting color, and install them as a color band, above the highest row of wall tiles you remove.
If you find more extensive moisture problems, the ultimate solution is to remove all the tiles in the tub surround and start over, with a vapor barrier topped by cement board (not green board) and mastic under the tile. Family Handyman walks you through the prep steps; find it by doing a Web search for “How to Install Cement Board for Tile Projects.”
If the bathroom walls are tiled beyond the tub surround, you don’t need to change those unless you want to. For the tub surround, just pick out new tiles that offer a pleasing contrast with the areas you won’t change. Basic white tiles go with almost everything.
Whatever fix you make, be aware that grout is not waterproof. Apply a sealer.
This story was originally published at washingtonpost.com. Read it here.